We’re busy with a journey of discovering the basics of writing good asynchronous code. Here’s a quick road map:
In Part 1 we’ve set the stage for asynchronous programming by discussing some basic jargon and touched on the difficulties of the traditional approach to Multi-tasking. We quickly saw how it can become very complex and tedious to debug and maintain.
Fortunately we have the Task Parallel Library (TPL). TPL was introduced by Microsoft to provide an easier approach to implement parallel processing in applications. Much of the plumbing is now abstracted away and as a result, a more understandable API is available.
Task
The Task class (System.Threading.Tasks namespace) is our main player in TPL. We basically wrap up an operation into a Task which can then be executed asynchronously.
Is a Task the same as a Thread?
Very important to understand that a Task is NOT a Thread. Behind the scenes, a Task by default makes use of the ThreadPool. Also it’s important to note that a new Task does NOT guarantee a new Thread. It could be run on the same thread as it is called on.
If you’re a Web Developer, you should be familiar with Javascript Promises. A Task is much like a JS Promise.
Please note there are big differences between Tasks and JS Promises, the statement is merely to help relate a Task conceptually to something we’re already familiar with.
A Task as a piece of work that can run asynchronously and is more closely related to data or program flow. It’s a higher level, data oriented abstraction of a piece of work. A Thread on the other hand is a more explicit low level component. It also doesn’t abstract very nicely with our Application / Domain Logic.
There are 2 Task classes:
- Task – No return type. An example would be to write to a log file. The operation gets executed and no return value is expected.
- Task<TResult> – TResult is the return type. An example would be to get a customer by their Id. A Customer instance result would be expected from the Task. (Task<Customer>).
Starting a task
There are different ways to start a task:
| Code |
Why’s & Why not’s |
var t = new Task(…);
t.Start(); |
- Slower than Task.Factory.StartNew(…)
- Handy when you need to create a task but only start it later.
|
| var t = Task.Factory.StartNew(…); |
- Use this if you’re using .Net 4.0 to start Tasks.
|
| var t = Task.Run(…); |
- Introduced in .Net 4.5
- Same as Task.Factory.StartNew except that it includes specific defaults that were often repetitively passed, making it easier to call.
|
Why is Task.Factory.StartNew faster than task.Start()? A Task can only ever be started once. The Start method on the instance has validation checks to ensure that a Task is not started again if it has already been run. When starting the Task from the Factory, this validation is not needed as it obviously has not run before since the Factory itself creates it.
Finally time to see some code. Let’s set the scene with some “heavy” synchronous code:
public static int HeavyCalculation(int number)
{
   int total = 0;
   for (int i = 0; i < number; i++)
   {
      unchecked { total += i; }
   }
   return total;
}
Here we have a method which receives a number, loops from 0 until the number passed, whilst keeping a running total. The total is then returned to the calling code.
The unchecked operator simply means that if we go past the maximum value that an integer can hold, instead of throwing an overflow exception, it will flip over to the minimum value and carries on.
static void Main(string[] args)
{
   Stopwatch sw = Stopwatch.StartNew();

   int answer1 = HeavyCalculation(2000000000);
   int answer2 = HeavyCalculation(1800000000);
   int answer3 = HeavyCalculation(int.MaxValue);

   int sumTotal = answer1 + answer2 + answer3;

   sw.Stop();

   Console.WriteLine("Answer: " + sumTotal);
   Console.WriteLine("Time: " + sw.ElapsedMilliseconds + " ms");

   Console.ReadLine();
}
Our calling code simply does 3 calculations on some big numbers; the answers are then summed up and written to the console window. It took about 12 seconds to execute.

Let’s convert the 3 calculations into Tasks and allow them to run asynchronously.
static void Main(string[] args)
{
   Stopwatch sw = Stopwatch.StartNew();

   var t1 = Task.Run(() => HeavyCalculation(2000000000));
   var t2 = Task.Run(() => HeavyCalculation(1800000000));
   var t3 = Task.Run(() => HeavyCalculation(int.MaxValue));

   int sumTotal = t1.Result + t2.Result + t3.Result;

   sw.Stop();

   Console.WriteLine("Answer: " + sumTotal);
   Console.WriteLine("Time: " + sw.ElapsedMilliseconds + " ms");

   Console.ReadLine();
}

This time it took about 4.5 seconds to execute. Same results and almost 3 times faster, that’s not bad at all!
Let’s quickly discuss what happened in the above code.
- The application will quickly run through to line 9.
- At this point, all 3 Task have been started asynchronously.
- The reason the application pauses at line 9 is because now we are requesting the Task’s results.
- It cannot give a Result until it has one, so it blocks.
- Fortunately, since all 3 Tasks ran in paralllel, they will more or less get their results at the same time.
Don’t worry if you don’t quite understand how the “waiting” of Tasks work, we’ll get to that soon.
Observing Tasks
So we can create Tasks and send them off into the “oblivion” to do what they need to do and in the mean time we do some other neat stuff. Sometimes we need to get back some results or at least wait for tasks to finish before doing our next set of work.
Waiting for a Task to return a Result or simply waiting until a Task is done, is know as “observing a Task“.
There are 2 ways to observe a Task:
- Asking for the Result
- Pause, by calling Wait
Asking for the Result.
var t1 = Task.Run(...);
var t2 = Task.Run(() => GetName());

int number = t1.Result;
string name = t2.Result;
In the above code, we created 2 Tasks (Task and Task). I’ve intentionally indicated Task for the first task and just Task on the second to show that there are different ways calling Task.Run().
The first Task we explicitly say that our Task is a task returning integer and therefore any method called in Run, MUST return an integer.
In the second Task, we simply say Task.Run and depending on the return type of the method passed into the Run, the Task determines its result type.
Both Tasks (t1 and t2) are started and run asynchronously. Then at Line 4 the main thread will wait until t1 is done and bring back the result. After that in Line 5, the main thread waits until t2 is done and brings back a result.
Pause by calling Wait
We can observe a task by using the Wait method. This is often done when we don’t have a return type, but we still want to make sure the Task completes before continuing. Here are some different ways to Wait for a tasks:
t1.Wait();
- We can call the Wait method on the Task instance.
- This would mean that calling thread would stop it’s execution and wait until the Task instance is done before continuing.
Task.WaitAll(t1, t2, t3)
- Calling the static WaitAll method allows us to pass in an array of Tasks.
- The calling thread will now wait at this point until all the tasks passed have completed before continuing
Task.WaitAny(t1, t2, t3)
- Calling the static WaitAny method allows us to pass in an array of Tasks.
- The calling thread will now wait at this point until any of the tasks passed have completed.
- Once ANY of the Tasks have completed, the calling thread will continue execution, regardless of whether the other Tasks are done or not.
Task Exceptions
We’re are now TPL Masters!? Not yet, we still need to touch on Exception Handling. What happens when exceptions are thrown?
There are 2 exception “quirks” which caught me out and so I consider them very important.
- Tasks only throw
AggregateException's.
- It’s possible that multiple exceptions are thrown together (as we’re running our Tasks asynchronously) and therefore Exceptions thrown are bundled into an
AggregateException.
- To get the thrown Exception(s) details, we use the InnerExceptions property (Note: This is InnerExceptions, not the the standard InnerException).
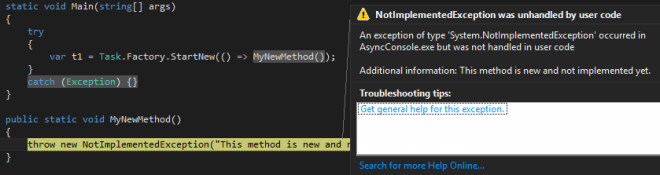
- If a Task is NOT Observed, the Exception will be unhandled.
- Very important! If you do not observe a Task (Wait for it or ask for it’s Result), it WILL remain unhandled, even if you wrap the neatest try/catch around it.
- See the snapshot below. The exception in MyNewMethod is unhandled, even though there’s a try/catch around the Task calling it.
Let’s practice what we preach and implement better Exception handling.
var t1 = Task.Run(() => MyNewMethod());
try
{
   t1.Wait();
}
catch (AggregateException aggEx)
{
   foreach(var ex in aggEx.InnerExceptions)
   {
      if (ex is NotImplementedException)
      {
         Console.WriteLine("NotImplementedException: " + ex.Message);
      }
      else
      {
         Console.WriteLine("Generic Exception: " + ex.Message);
      }
   }
}
In the above code we:
- Observe the exception (Wait() at line 4)
- Only catch an AggregateException
- Iterate the InnerExceptions and handle them individually.
Since the AggregateException is simply a “bundling” of exceptions, what if we wanted certain exceptions to be handled, whilst others we want to bubble upwards for the caller to handle?
We could check the Exception type and then rethrow Exceptions we don’t want handled. The AggregateException class has a nice little Ace up it’s sleeve for this purpose. The Handle(Func<Exception, bool>) method:
static void Main(string[] args)
{
   var t1 = Task.Run(() => MyNewMethod());
   try
   {
      t1.Wait();
   }
   catch (AggregateException aggEx)
   {
      aggEx.Handle(HandleException);
   }
}

private static bool HandleException(Exception ex)
{
   if (ex is NotImplementedException)
   {
      Console.WriteLine("Not Implemented!");
   }
   else
   {
      Console.WriteLine("Generic Exception: " + ex.Message);
   }
   return true; // True means we've handled the exception.
}
Here we simply create a HandleException method which takes an Exception and returns a boolean value. All the Exceptions within AggregateException will be passed to this method one at a time. If false is returned, the Exception is unhandled and will be bundled up into a new AggregateException and then rethrown to the caller. If true is returned, the exception is handled.
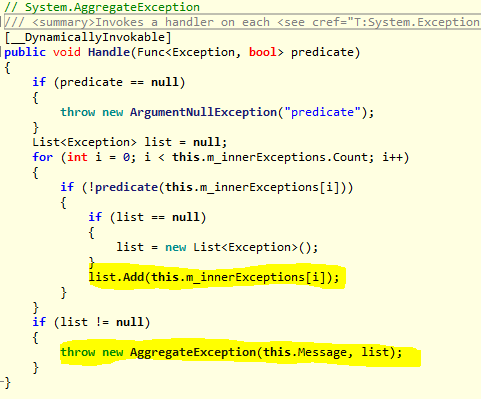
For interest sake, I checked out the decompiled code of the Handle method to see exactly what it does: In the highlighted parts we see that the “handled = false” exceptions are simply added to a list of Exceptions and re-thrown as a new AggregateException.
If we do want to catch our unobserved exceptions we can subscribe to the TaskScheduler’s UnobservedTaskException event.
TaskScheduler.UnobservedTaskException += TaskScheduler_UnobservedTaskException;
...
private static void TaskScheduler_UnobservedTaskException(object sender, UnobservedTaskExceptionEventArgs e)
{
   //...
}
The above method will only get hit once the GarbageCollector makes his round and collects a Task which threw an unobserved exception.
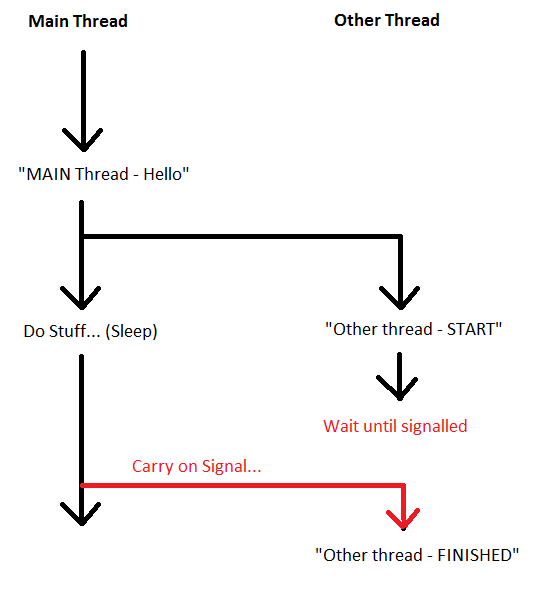
Cancelling Tasks
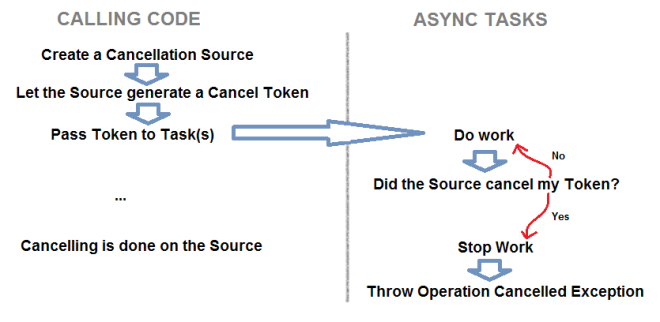
Now we’re capable of sending off Tasks asynchronously and waiting for them when we need to. But what happens if we need to cancel a long running Task? If we waited for the Task, we may have to wait for a long time. Once again TPL offers us a simple way to handle this. The image below describes the Cancelling process.
Let’s put some code to the idea.
CancellationTokenSource cts = new CancellationTokenSource();
public void DoWork()
{
   try
   {
      var t1 = Task.Run(() => MyLongMethod(cts.Token));
      t1.Wait();
   }
   catch (AggregateException aggEx)
   {
       //... Handle OperationCancelledException
   }
}

public void CancelTask()
{
   cts.Cancel();
}

public void MyLongMethod(CancellationToken token)
{
   for (int i = 0; i < 10; i++)
   {
      if (token.IsCancellationRequested)
      {
         // Clean up task here.
         throw new OperationCanceledException();
      }
      Thread.Sleep(500); // Simulating some work.
   }
}
Let's steps through the above code:
- Calling code creates a CancellationTokenSource. (line 1)
- CancellationTokenSource instance has a property CancellationToken. This token is passed to the Task(s) (line 6)
- The Task must do work and continuously check if the CancelToken has been cancelled.(line 24)
- When tasks must be cancelled, Call Cancel() on the source which changes the Token’s status to Cancelled (line 17). CancellationToken is a reference type, so all the tokens passed into tasks will point to the same token on the heap, and so changing the status to Cancelled will “signal” all Tasks.
- Next time Tasks check their Token’s status they will see it’s been cancelled. Now they stop their work, clean up and throw OperationCancelledException. (line 26-27)
- Calling code will catch this exception and handle it as required. (line 11)
Using the method ThrowIfCancellationRequested on the token is easier. This wraps up line 24 -28 into a single method call.
Chaining Tasks
Seldom we find code to be quite as simple as all our examples in this article so far. Let’s paint a new scenario:
We have an application that needs to call MyFirstTask and then when that is done, it must call MySecondTask and finally when this is done it must write “Finished” to a log file. From what we learnt, we could do the following:
// Not the best way!
var t1 = Task.Run(() => MyFirstTask());
t1.Wait();
var t2 = Task.Run(() => MySecondeTask());
t2.Wait();
var t3 = Task.Run(() => WriteToLog("Finished"));
t3.Wait();
Above you see we need to execute a task, wait for it to finish before kicking off the next one. Here’s a better way to represent the code above:
var t1 = Task.Run(() => MyFirstTask())
           .ContinueWith((prevTask) => MySecondeTask())
           .ContinueWith((prevTask) => WriteToLog("Finished"));

t1.Wait();
Here we see chaining taking place. Instead of creating new tasks for every step, we simply chained them. Once the first Task completed, the ContinueWith will execute and so on.One other thing to note is that the continue with a single parameter prevTask which basically is the antecedant / Previous Task which kicked off the ContinueWith. This way we can access the Result of the first Task from withing the ContinueWith.
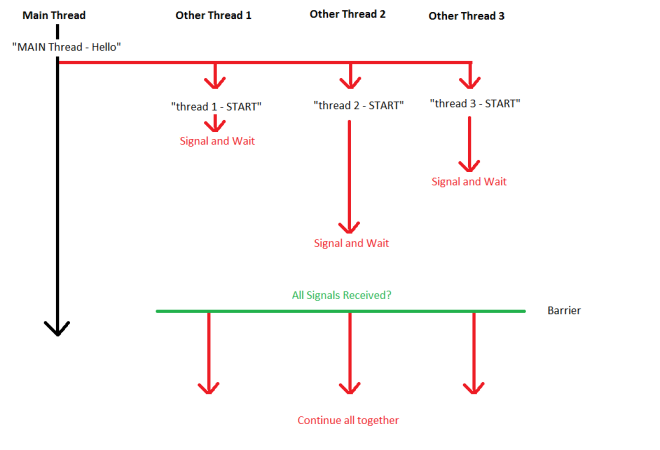
The Task Factory has some static methods which take multiple tasks:
- Task.Factory.ContinueWhenAll(tasks, (allTasks) => ….) – will wait until ALL Tasks are done before running the continuation Task.
- Task.Factory.ContinueWhenAny(tasks, (firstTask) => …) – will wait until ANY Task is done before running the continuation Task.
None of the Continue methods will block the calling thread!. If you call Task.Factory.ContinueWhenAll(…) the calling code will continue on, since we have chained our continue with Task. If the calling code needs to stop, the Wait methods should be used.
Something else worth mentioning is that the ContinueWith method has and overload accepting TaskContinuationOptions. This allows us to chain a Task only when the previous one fails or is cancelled or is successful etc.
Scheduler / Dispatcher
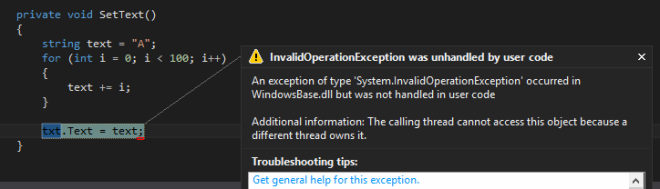
So what if we were using WPF and tried to update the UI from within a Task? We will still get the good old cross thread exception. Remember in Part 1 we said that each Thread has a dispatcher and dispatches instructions to the thread. No one else may dispatch instructions to that specific thread. So in our little WPF application, we would need to make sure that UI changes are passed to the Dispatcher governing the UI Thread.
Here’s a little WPF example code that would cause a cross thread exception
private void MainWindow_Loaded(object sender, RoutedEventArgs e)
{
   Task.Factory.StartNew(() => SetText());
}

private void SetText()
{
   string text = "A";
   for (int i = 0; i < 100; i++)
   {
      text += i;
   }
   txt.Text = text;
}
And the result (as we expected):
There are different ways of solving this:
- We could invoke our UI code with txt dispatcher (as we would have done before TPL)
txt.Dispatcher.BeginInvoke(new Action(() => txt.Text = text));
- Another way would be to leave SetText as is (without polluting it with Dispatcher logic) and changing the “context” on which the TaskScheduler runs. Here’s how that would look:
private void MainWindow_Loaded(object sender, RoutedEventArgs e)
{
   TaskScheduler uiScheduler = TaskScheduler.FromCurrentSynchronizationContext();
   Task.Factory.StartNew(() => SetText(), CancellationToken.None, TaskCreationOptions.None, uiScheduler);
}
As you can see in the code above, we get the current Context (which is the UI context) and then we pass that in as a parameter when we kick off our Task and then the Task execute on the UI thread.
Perhaps a more realistic example of the above would be to call GetText which does the heavy loading and then chain it passing the UI context into the ContinueWith method, where we would set txt.Text = prevTask.Result. This way our heavy processing happens on a different thread and only our UI logic is scheduled on the UI Thread.
Parallel class
A great Helper / Utility class which forms part of TPL is the static Parallel class. There are 3 main methods in the parallel class which we can use:
- Parallel.Invoke
- Parallel.For
- Parallel.ForEach
Parallel.Invoke
This method simply executes multiple methods in parallel. Kind of what Task.Run() does.
Parallel.Invoke(
  () => FirstMethod(),
  () => SecondMethod(),
  () => ThirdMethod());
So why would there be just another way to execute some tasks? The answer is that this way is faster.
Parallel.Invoke only takes methods without any return types (Action‘s). The reason for the performance increase is that Task.Run or Task.Factory.StartNew has to create a Task instance for every action performed in parallel, where as Parallel.Invoke does not return anything.
Simply put, use this method if you have methods that must be run Asynchronously and you don’t care about observing tasks (Send off tasks and forget about them).
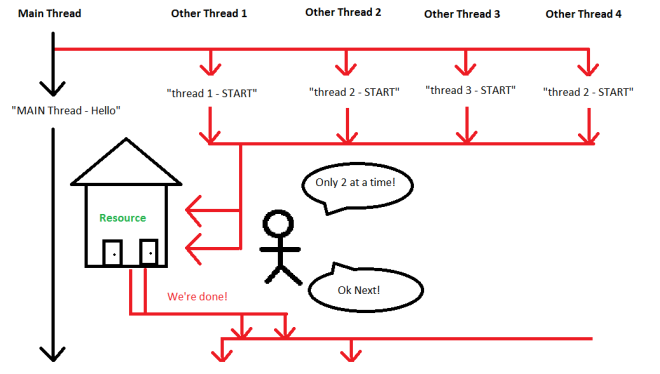
Parallel.For and Parallel.ForEach
When we’re iterating items, each item is processed one at a time. What if we could split the work across cores, significantly cutting the time it would take to process the entire collection? With Parallel.For and Parallel.ForEach we can now process our iterations in parallel.
Only ever use these methods if the sequence does not matter.
Some examples:
Parallel.For(1, 10, i =>
{
   Console.WriteLine(i);
});
or
var nums = new int[] { 1, 2, 3, 4, 5, 6, 7, 8, 9 };
Parallel.ForEach(nums, (num) =>
{
   Console.WriteLine(num);
});
Both examples with produce something like this:

PLINQ
PLINQ is parallel support for LINQ. There is an IEnumerable extension method .AsParallel() which returns ParallelQuery class. When we do our LINQ queries on a ParallelQuery, the actual execution of the query may happen asynchronously. I say may as there is no guarantee that the query will be processed asynchronously. TPL will sometimes opt to execute the query synchronously if it deems it to be faster.
The reason why processing the LINQ in parallel may be slower that synchronously, is that the cost of creating and synchronizing threads may be more expensive than simply executing the query.
Here’s some code:
List lstCustomers = ListAllCustomers();
var vips = from cust in lstCustomers.AsParallel()
           where customer.Status == "VIP"
           select customer;
Same LINQ, just call .AsParallel() on you IEnumerable and that’s it. Doesn’t get much easier than that 🙂
What’s Next?
That’s it for covering the basics of TPL. In Part 3, we will look at the async and await keywords introduced in .NET 4.5 and what makes them unique.